
 Photo and instructions courtesy of Design*Sponge
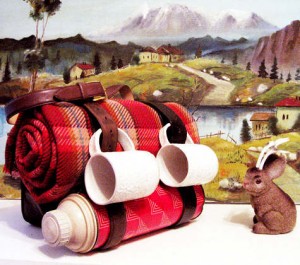
Who says you need to keep the party indoors? With Spring blowing its way in, it’s time to pack up your lunches and blankets and head outside for a picnic in the park! This cute and vintage-looking picnic pack can easily carry everything you need for a picnic for two, and can be made entirely from a purse and belts from a thrift shop! This project is probably not best for the beginner crafter, but if you’re not intimidated by leatherworking and are looking for that perfect craft challenge, you’ll be highly rewarded!
Materials
- three leather belts (at least two should be thick and long and about the same length – about 36″. the third can be shorter and thinner)
- old leather purse (could be any material, should have a strap and be fairly small)
- drill with 1/8″ and 3/16″ drill bits
- throw blanket
- thermos
- two mugs
- needle and thread (heavy duty thread and strong needle for leather or heavy weight fabric)
- super glue or e-6000
- scissors
- two standard pencils, un-sharpened (or a dowel the same length)
- twine
- big eyed needle (to fit the twine)
- sew on snaps (available at craft or fabric stores)
- pen
Instructions
check out the website for more pictures!
1. roll up your blanket and get your thermos. wrap the two long belts around the blanket so it is held snugly. you will probably need to add belt holes to the strap because it is much smaller than a waist would be. mark on the inside of each belt where the hole should be to snugly fit the blanket.
2. drill through the belts to create holes at the spots you marked. re-belt your blanket to check your new holes and adjust if necessary. your belts should be spaced about 8″ apart from each other on the blanket.
3. with the belts closed around the blanket take the end of the straps that extends past the buckle and wrap around the thermos. then slide the belt strap back through the leather belt loop that sits near the buckle (the loop uses to hold the belt strap against the body if there’s extra). pulling this snugly should create a firm grip on your thermos, and you should still have a good amount of belt strap left on each side. if your belts are the same length, this is ideal and you will have the same amount remaining on both sides.
4. take a sew-on snap and place it near the end of one belt strap on the inner side of the strap. using a pen, mark the holes in the snap on the belt (these are the spaces where you would sew through to connect the snap to fabric). drill holes through each of these marks with the 1/8″ drill bit. this is going to make sewing much easier. if you have a needle and thread (and muscle!) that can handle thick leather, then you can just sew the snap on. but i used the drill holes to pass the thread through, and sewed the top half of the snap on that way.
5. when the top of the snap is secure, connect it to the bottom of the snap. slide the handle of a mug onto the belt strap and pull the belt strap tight, marking where the snap lands on the belt when it is pulled taught. this is where the bottom of the snap should go. mark it with a pen and drill holes like you did in step 4 (you will need to take the belt off the blanket to drill through this part, because it lays against the blanket.)
6. sew the bottom half of the snap onto the strap of the belt. when you are done, put the belt back on the blanket and the thermos, slide the mug handle on again and make sure the snap reaches its bottom half and snaps securely.
7. repeat steps 4 – 6 with the second belt.
8. take the purse and push the strap through behind the two main belts on the opposite side from the mugs. cut the strap so that the two sides will meet in the middle and that the total length is just the width of the distance between the two main belts.
9. sew the now shorter purse straps together in the middle to create a closed strap. disassemble your pack and loop the belt straps over the purse strap so that the purse is hanging on the opposite side of the blanket from the mugs.
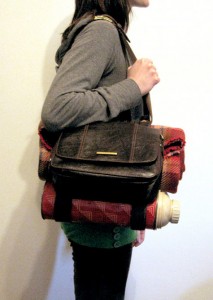
9. with the blanket, thermos, purse, and mugs secured by the belts, take the third belt and slide it underneath the two belts at the top of the blanket roll. this will be your handle buckle the belt to create a closed circle, and hang the pack on your shoulder to gauge where the weight distributes.
10. when you have determined where the handle needs to be for the pack to hang correctly, hold it in place and mark the third belt on either side of where the two main belts hit it. mark on the two main belts where the third belt hits it as well
11. disassemble the pack and hold the third belt underneath the two main belts where you marked. at the intersection of the straps and the handle, drill four holes through both the main belt and the third belt with the 3/16″ bit.
12. thread your bug eye needle with twine and sew a criss-cross pattern through the four holes, securing the two belts tightly together. repeat this with the second strap.
13. now the handle is secured to the two main belts. you should reassemble here and check that everything is in the right place.
14. disassemble again and flip the belts upside down so you are looking at the underside of the handle and where ti meets both main belts. tie the two pencils (or dowel) onto the underside with twine right along the center of the underside of the strap. this will give the strap more strength and keep the belts from pulling towards each other with the weight of the pack.
15. take the leftover purse strap (or twine, or handlebar tape if you prefer – any of that will work but i like the consistency of using the purse material) and glue the one end to the pencils right at the edge of where the handle meets the left main belt strap. continue to wrap it around the handle and the pencils, securing with glue on the pencil side, until you reach the other edge of the handle, where it meets the right main belt strap. glue to the pencils to secure and cut any extra purse strap. now you have a nice, wrapped, reinforced handle.
16. reassemble everything and fill your pack!